Session 20: Tracking Mouse Movements
also: Choosing and Repeating Actions
Download this starter code to use throughout the session.
Preparation: Mouse Movements on a Web Page
Introduction
We have been learning how to use JavaScript to write code
that interacts with the HTML and CSS of a web page. In this
week's reading, we learn how to use
an if statement
to write code that makes decisions about what to do next.
Next week, we will look deeper into how we can use JavaScript to interact with the user through actions they take: clicking on a button, entering text in a field, even moving the mouse. A fun way to practice with code that makes decisions, though, is to interact with users and their actions. Let's learn a bit about how JavaScript gives us access to mouse movements so that we write some code that tracks the user's mouse.
In particular, let's learn how to write the code that displays a message to the user in this interactive web page of Middle Earth. Notice that the page tracks the location of the mouse and also provides information relating the mouse location to the goal, Lothlorien.
To do this, we need to learn two things:
- how (x,y) coordinates work on a web page
- how the browser gives us information about the mouse's location
The Geometry of a Web Page
We can think of the screen as a coordinate plane where the top left corner has coordinates x = 0, y = 0:
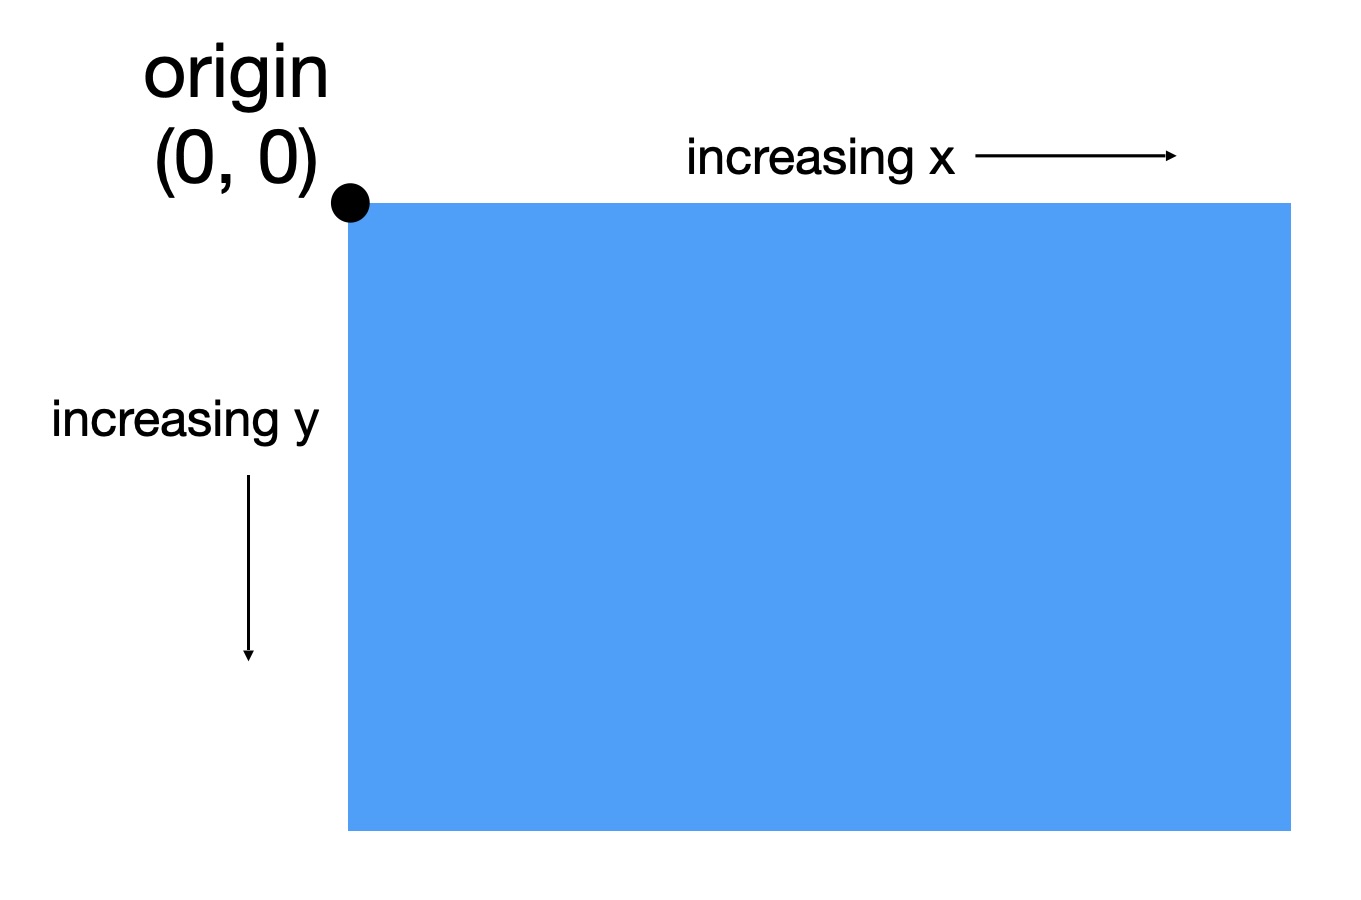
If you move your mouse 500 pixels to the right, the coordinates will be x = 500, y = 0, or (500, 0). If you then move the mouse 300 pixels down, the coordinates will be x = 500, y = 300, or (500, 300).
We can think of every element on the page in the same way. Each element has data properties that hold its origin, width, and height:
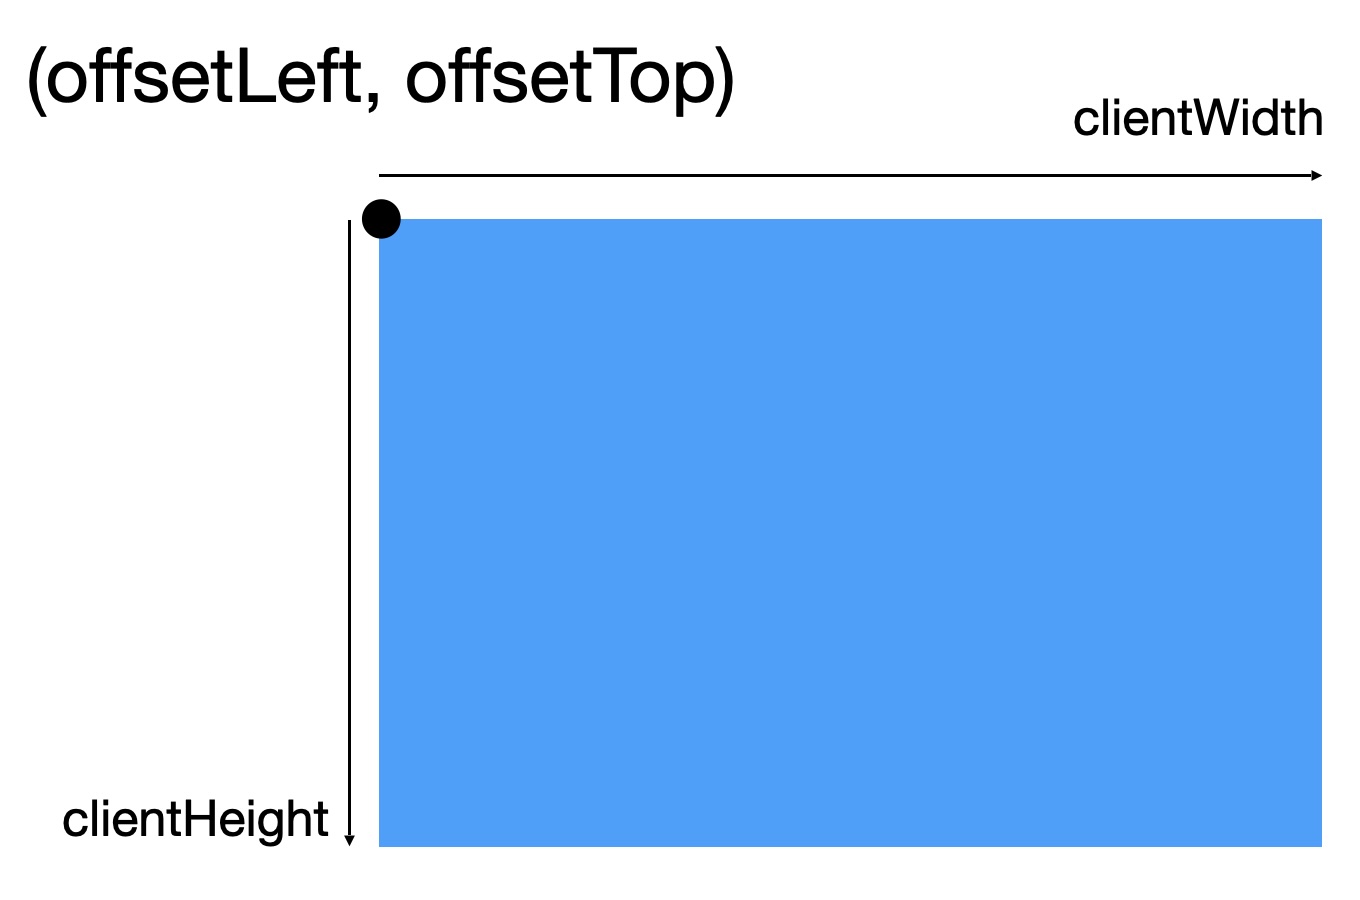
If element is an HTML element on the page, then
element.offsetLeft
element.offsetTop
element.clientWidth
element.clientHeight
hold the values associated with the element's location.
We can use these values to determine if a point is inside the box by constructing boolean tests on the mouse's position, similar to the range test we see in this week's reading to validate a column number in a table:
( (column > 0) && (column < 4) )
In the case of Lothlorien...
-
The mouse's x-coordinate must be at least
element.offsetLeft
and no more thanelement.offsetLeft + element.clientWidth. -
The mouse's y-coordinate must be at least
element.offsetTop
and no more thanelement.offsetTop + element.clientHeight.
The Location of the Mouse
The browser gives us access to the mouse's (x,y) coordinates via an event. Up to now, we have worked with one kind of event, the mouse click. We will learn more about events next week.
For now, it is enough for us to know that every event has
data properties named clientX and
clientY. These are the x- and y-coordinates
of the current mouse position.
The if Statement (2024)
To accomplish our task, we need to write an if
statement.
A Lab Exercise: A Script to Track Mouse Movement
Now, let's do the lab exercise to give users feedback about their location in Middle Earth.
A Solution
Here is a possible solution. I built my code in steps:
Step 1 : create and write the base message
let locationStr = 'You are at x=' + mouseX + ', y=' + mouseY + '.';
let messageElement = document.querySelector('#message');
messageElement.innerText = locationStr;
Step 2 : get the data properties needed to determine if mouse is in the Lothlorien box
let target = document.querySelector('#lothlorien');
let targetX = target.offsetLeft;
let targetY = target.offsetTop;
let targetWidth = target.clientWidth;
let targetHeight = target.clientHeight;
Step 3 : compare the coordinates to the left/right and top/bottom of target
let xBigEnough = mouseX > targetX;
let xSmallEnough = mouseX < (targetX + targetWidth);
let yBigEnough = mouseY > targetY;
let ySmallEnough = mouseY < (targetY + targetHeight);
Step 4
: write the if statement to append the desired
text to message depending on position
if (xBigEnough && xSmallEnough && yBigEnough && ySmallEnough) {
  locationStr = locationStr + '  You have reached Lothlorien!';
}
else {
  locationStr = locationStr + '  You are still on your way.';
}
Finally, I moved the code to display the complete string to the bottom of the script.
messageElement.innerText = locationStr;
When in doubt, create a variable to hold a value that you want to use. That let's you solve a small part of the problem and save the result to use in solving another part of the problem.
From Choosing Actions to Repeating Actions
In
the reading for this week,
we learn about JavaScript if statements.
They enable our code to make decisions:
- do this, or not
- do this, or do that
We ultimately used an if statement to ensure
that the number a user enters is
a valid column number
in a table on
a web page:
let column = prompt('Column number?');

if ( (column > 0) && (column < 4) ) {
  let color = prompt('A color?');
  let selector = 'td:nth-child(' + column + ')';
  let cell = document.querySelector(selector);
  cell.style.backgroundColor = color;
}
else {
  alert('Column must be 1, 2, or 3.');
}
What if want to let the user set the color of two cells? We could copy-and-paste the code, making changes to support a second column.
We can do better. A function is a named piece of code that can be reused. We can put our cell-coloring code in a function and call it twice.
But what if want to let the user set the color of twenty cells? Do we have to write twenty function calls? It would convenient if we could write a shorter statement that repeats the function call twenty times.
And what if, rather than stopping after the user enter an invalid column number, we want to ask the user for a number again, until they enter a valid one?
JavaScript has statements to implement both of these ideas.
Repeating Actions
In addition to selecting which statements to execute, scripts need to be able to repeat actions under some conditions.
Before today, our scripts have used sequences of statements, function calls, and selection of statements. Adding repetition of statements gives us the last essential tool we need for writing scripts.
In programming, we call a repeated set of statements a loop. There are two kinds of loop:
-
A definite loop is one where we know up front
how many times we want to repeat the code. For example, we
may want to change the color of twenty cells, or process all of
the rows in a table. In JavaScript, we will implement definite
loops using a
forstatement. We will learn aboutforstatements next time. -
An indefinite loop is one where we don't know
how many times we want to repeat the code. For example, we may
want to ask the user for a value until it is in the valid range,
or process the elements in a list until we reach a stopping
value. In JavaScript, we will implement indefinite loops
using a
whilestatement.
The while Statement
The while statement has the same form as an
if statement:
while (expression) {
  // execute these statements [A]
}

// resume flow and execute these statements [B]
As with an if statement, JavaScript executes a
while statement by first evaluating the condition,
expression. If the condition is true, it executes
the statements inside the { } block. If it is false, then it
resumes flow and executes the statements after the block.
Here is the difference: when the condition is true, after it executes the statements inside the block, it goes back to top of the statement and repeats the process.
For example:
let x = 0;                  /* 1 */

while (x < 10) {            /* 2 */
  console.log(x);           /* 3 */
  x++;                      /* 4 */
}

console.log('moving on');   /* 5 */
Statement 1 initializes x. Statement 2 tests the
condition.
If the condition is true, Statement 3 writes to the console,
Statement 4 increments x, and then the code jumps
back to Statement 2.
If the condition is false, the loop ends, and the normal flow of execution proceeds with Statement 5.
What will this code print to the console?
The variable x is sometimes called a
sentinel. Its value is what the loop uses to
decide whether to continue or to exit. Notice that this code
initializes the sentinel outside the loop and changes its
value inside the loop.
Using a while Loop in our Data Validation Code
A while statement is just what we need to change
our cell-coloring function so that it repeatedly asks the user
for a column number until the number they enter is valid.
The code will keep asking the user for a value as long as the
"valid" condition
( (column > 0) && (column < 4) ) —
is false. Recall that we can negate an expression using the
logical "not" operator, !. Then it will execute
the rest of the code. So:
function colorCell() {
  let column = prompt('Column number?');

  while (! ((column > 0) && (column < 4))) {
    alert('Column must be 1, 2, or 3.');
    column = prompt('Column number?');
  }

  let color = prompt('A color?');
  let selector = 'td:nth-child(' + column + ')';
  let cell = document.querySelector(selector);
  cell.style.backgroundColor = color;
}
Converting our if statement into a
while statement involved rethinking our algorithm
a bit, almost turning it inside out. And the condition has
become even more complicated.
We will pick up our thinking about how to write
while statements next time. We'll then turn our
attention to implementing definite loops with a for
statement, and see how we can use for loops to
process a set of the elements in our web page.
Closing
Homework 8
asks you to practice writing scripts and functions on your own.
It is due tomorrow.
Homework 9
will give you more JavaScript practice, especially with
functions and if statements.