Session 19: Implementing Footnotes with Hidden Elements
Download this starter code to use throughout the session.
Where Are We?
Last time, we learned how to add dynamic behavior to a web page using a button. Along the way, we learned a few new things:
- the idea of an event handler and how to implement one as a JavaScript function
-
new properties and methods of elements in the DOM, such as
element.idandsetAttribute()
Let's use this new knowledge to implement a useful behavior for
web pages: footnotes and other hidden information. In order to
accomplish our goal, we will learn some new things about the
DOM, revisit querySelectorAll() and
forEach(), and learn a new, more compact way to
write functions!
Our Goal
Back in Session 14, I showed a couple of web pages that used HTML and JavaScript (and a little CSS) to implement footnotes. One is from Martin Fowler, the author of Refactoring. Consider this screen capture from that page:
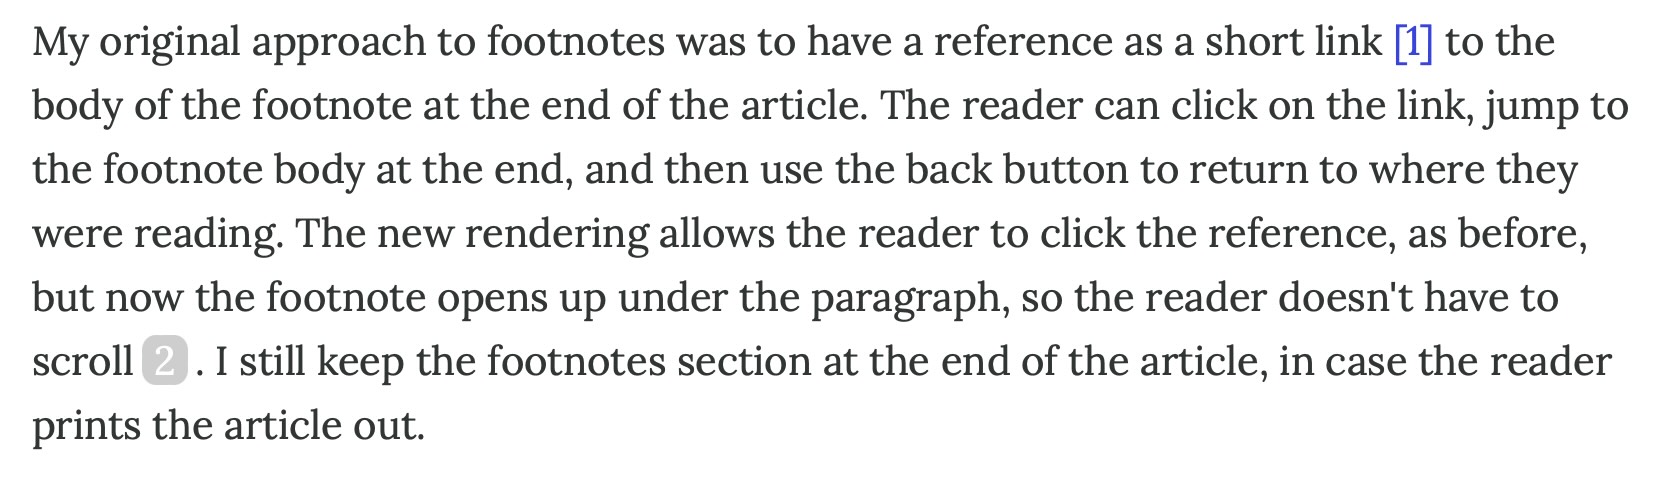
Note the shaded 2. It is a footnote marker. When we click on it, this happens:
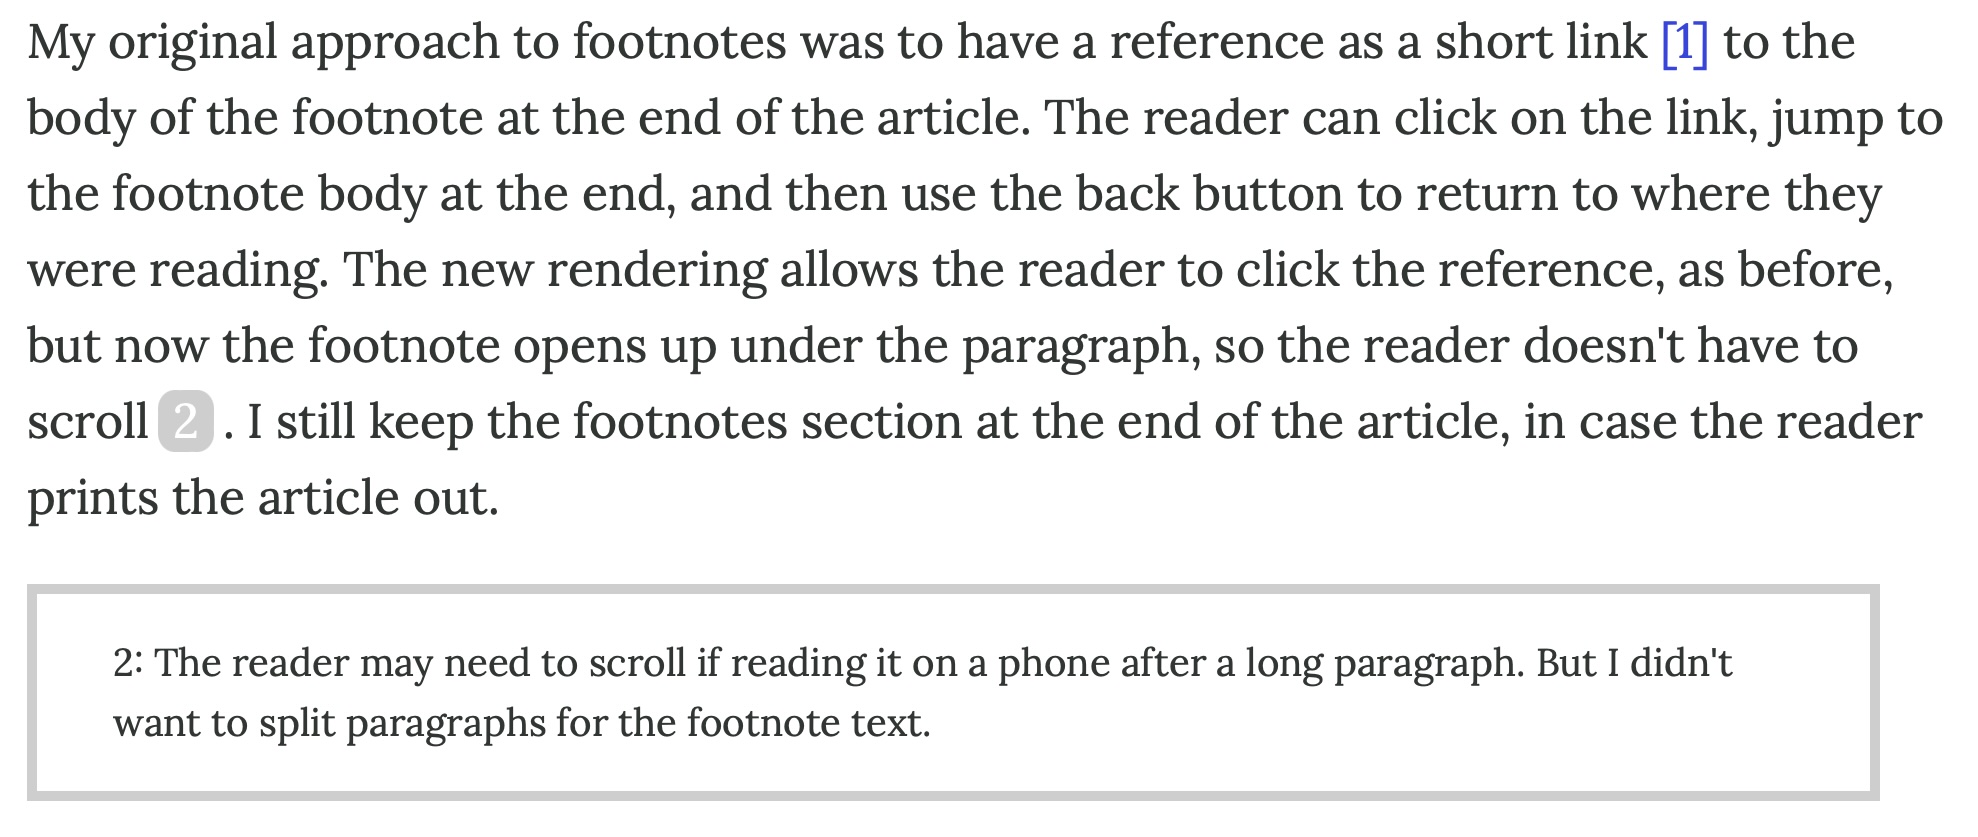
Click on the marker again, and the box disappears.
This is our goal. We have almost all the tools we need, and this is a good time to learn the rest.
To set up our work, suppose that we have the following text:
When writing a document, the author sometimes wants to include content that not all readers care to see, or which the care to see only at a time of their choosing. One way we do this in a standard print document is a footnote. Footnotes appear at the bottom of the page. In the main text, the footnote is indicated by a superscript.
In a web document, "the bottom of the page" does not mean quite the same thing as it does in a book. The goal of a footnote is to have the note appear close to the text, allowing the reader to glance at them, or not, without interrupting their reading of the main text. A single web page can be quite long (as long as a traditional book chapter, or even as a long as a book!), which would put a footnote far away from the original text.
I would like to add a footnote to the sentence
One way we do this in a standard print document is a
footnote.
identifying the two common alternatives: endnotes and side
notes.
Let's start with
this document.
Notice that the page we see in the browser differs from the HTML
source of the page, because the HTML contains a hidden paragraph
with the content of the footnote. The footnote is indicated by
aspan element, which we can select by its ID.
Version 1: Implementing the Footnote
First, let's style the subscript number itself. For now, let's
put our styles into a style element in the
document, to keep our experiment all in one file.
.note {
  font-family: Arial, Helvetica, sans-serif;
  font-size: 90%;
  color: white;
  background-color: lightgray;
  border-radius: 4px;
  padding: 0 3px 1px 3px;
  margin-right: 3px;
}
Next, let's write JavaScript to respond to a click. Again,
let's put our code into a script element in the
source document.
Last time,
we learned how to do this with a button. Here's our first new
knowledge of the day: every element on a web page has an
onclick property and can respond to clicks!
function openNote(e) {
  console.log('footnote clicked');
}

let mark = document.body.querySelector('.note');
mark.onclick = openNote;
When the user clicks on the footnote, we want to remove the 'hidden' attribute from the next paragraph. How can we select that element to process?
We could add an id to the hidden paragraph, as we did last time. However, that might get unwieldy as we add more footnotes to the page. Let's let the browser help us by examining the DOM for the page.
Recall that the browser exposes the web page as a JavaScript object. The DOM is a tree of elements on the page. The document contains the head and body elements, which contain the rest of the page's elements.
Here is the DOM tree for our footnote document:
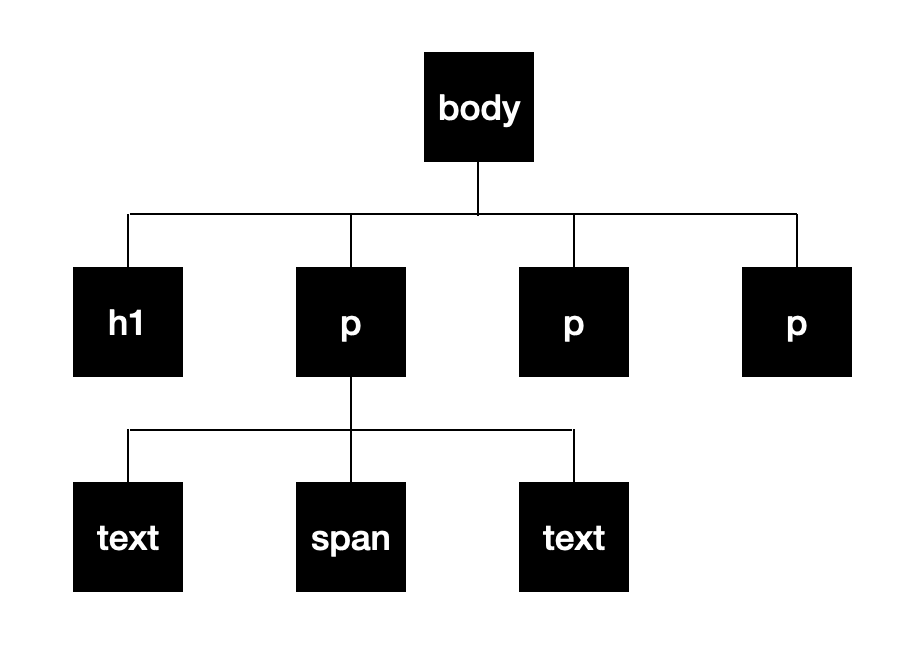
The text elements are the parts of the first
paragraph that come before and after the tagged
span element.
Last time, we learned that every DOM element has
a number of properties
we can access and use in our code, such as
element.id. There we saw mention of the
parentElement property. In our tree, the
p element that contains the span is
its parent element. DOM elements also have a
nextElementSibling property that refers to the
element next to it in the tree.
Now we have what we need. The hidden paragraph is the next
sibling of the span's parent. If we have the
span, we can use parentElement and
nextElementSibling to get the hidden paragraph:
function openNote(e) {
  let mark = e.target;
  let parent = mark.parentElement;
  let note = parent.nextElementSibling;
  note.removeAttribute('hidden');
}
It works! Finally, let's style the footnote:
.notetext {
  font-size: 90%;
  border: 3px solid lightgray;
  padding: 10px 20px;
  margin: 15px 0;
}
First achievement unlocked: Version 1.
The only thing missing is that we can't close the note by clicking on the footnote marker again. Fortunately, we learned how to do this last time, too.
Version 2: Toggle the Footnote (An Exercise)
Last time, we implemented this behavior for a button. Our code included two complementary functions, one of which looked like this:
function revealAnswer(e) {
  let answer = document.querySelector('#answer');
  answer.removeAttribute('hidden');

  // now 'toggle' the button to hide the answer
  let button = e.target;
  button.innerText = 'Hide Answer';
  button.onclick = hideAnswer;
}
Let's implement this for our footnote.
openNote() function to change
the footnote's handler to closeNote(). Then
write the closeNote() function.
The two lines of code that connect the initial event handler stay the same.
Solution
Here is
a possible solution.
We already have the span in a variable, so we only
have to add one line to openNote():
mark.onclick = closeNote;
The closeNote() function is a copy of
openNote(), with changes to the lines that deal
with hidden and onclick.
The same basic idea we learned last time works for us here. That's a good sign that we are making progress!
Version 3: Handling Multiple Footnotes
Are we done? Basically, yes. But there is a small wrinkle. Take a look at Martin's page again. It has two footnotes.
My document has a parenthetical (Eugene loves parentheticals!) that could be a footnote:
... <span class="note">2</span> ...

<p class="notetext" hidden>
  A single web page can be as long as a traditional book chapter,
  or even as a long as a book!
</p>
Nice. But look at how we assign the first footnote's event handler:
let mark = document.body.querySelector('.note');
mark.onclick = openNote;
We use a class to select the element. If we have more than one footnote, that won't work. To select each marker individually, we would need to assign each a unique id.
Such as approach would require the writer of the document to
create, and keep track of, all the different id's. That's
because, as written, our JavaScript code requires that we
find every footnote marker on the page and give it
openNote as an onclick handler.
That's a lot of work, and a distraction from writing the
document. Besides, that's the sort of repetitive work that
programs can do for us.
In Session 17, we saw a better way. When faced with
replacing every 7
in our St. Ives nursery rhyme with the user's number,
we saw that we could use querySelectorAll() to
select all of the elements with the same class. Then, we used
forEach() to take the same action on all of them.
What we would like to do is something like this:
let marks = document.body.querySelectorAll('.note');
marks.forEach( assign the event handler );
forEach() requires us to give it a function that
works on a single element. In our case, we want to set the
element's onclick property openNote.
So let's write a function and give it to forEach():
function addResponder(element) {
  element.onclick = openNote;
}

let marks = document.body.querySelectorAll('.note');
marks.forEach(addResponder);
Version 3 does the trick. We are done.
Version 4: Using an Anonymous Function (A Bonus)
We are done, but that doesn't mean we can't make our code better. We just need to know one more thing about JavaScript.
Look again at the end of our script:
function addResponder(element) {
  element.onclick = openNote;
}

let marks = document.body.querySelectorAll('.note');
marks.forEach(addResponder);
We had to write a function, styled on three lines, to wrap one
short line of code: element.onclick = openNote;.
We also had to give it a name, even though we never call it
ourselves. We needed the name so that we could pass the
function to forEach.
We do this sort of thing all the time in JavaScript. It is a style of programming that involves writing functions and giving them to some element to call in response to an event on the web page.
This is so common in JavaScript that the language gives us a
shorthand way of writing functions. An anonymous
function is a function written like any other but
without a name. For example, we can write
addResponder() without its name:
function(element) {
  element.onclick = openNote;
}
This function is a literal value just like a number or a string. We can pass it as an argument:
marks.forEach(
  function(element) {
    element.onclick = openNote;
  });
Reading code like this takes a little getting used to. Once we are familiar with it, though, its brevity can be attractive. If you'd like to write code like this, feel free. Just take care to get the closing parenthesis and closing brace in the right order!
JavaScript has an even shorter form of anonymous function...
If you read JavaScript on the web, you may see this one-line function form:
(element) => { element.onclick = openNote; }
This even briefer way of writing a function works especially
for one-line functions. As with the other form of anonymous
function, use this only if you are comfortable with it. It is
perfectly to write a standard named function and use its name
as a value.
And now we are done: Version 4
Post-Mortem
What happens if there are two footnotes in one paragraph?
- one option: use unique IDs for each note/text pair
We approached this exercise as we have HTML and CSS tasks in the past: find a model to emulate, and try to re-create it. I recommend that you try to implement your version without looking at the original code, because that makes you confront problems and use your knowledge to solve them. We learn best by trying.
Now that we have implemented a working solution, we might learn something by looking at Fowler's implementation.
- 2024-footnote-rendering.css
- mfcom.js
His JS code is a bit different than ours, because we are still beginners and because our approach doesn't handle multiple footnotes in the same paragraph. Our CSS is surprisingly close! I see two key differences:
-
The styling for the
spanusecursor: pointer;. -
Fowler's code does not use
hidden. Instead it uses thedisplayattribute, toggling it between 'none' and 'visible'. Give that a try! Which approach you prefer?
Did you like working in one page?
-
Using a
styleelement keeps things all in one place while we are experimenting and growing a solution. Now that we are done, we can move the CSS tofootnote.css. -
Likewise for the
scriptelement, though this one already seems unwieldy in the HTML source. Let's move the JS code tofootnote.js.
Here is one final version of our code, separated out: [ HTML | CSS | JavaScript ].
Closing
Reading 11 is coming soon. It will include two topics:
- a section on how functions work when we pass arguments
-
a section on JavaScript
ifstatements, which we will start using soon
Homework 8 is up. Let me know if you have any questions.