Session 7: An Introduction to CSS
These notes draw on material created by David Humphrey.
CSS as a Description Language
CSS is the second of three languages that we will learn this semester for creating web sites. Like HTML, it is not a programming language. However, unlike HTML, it is not a markup language, either.
CSS is a language for defining style information. With CSS, we describe what the elements on a web page looks like, independent of its content. In CSS, we define rules that control a web page's appearance.
The syntax of the language is small and relatively easy to learn. That's the good news. There are challenges to mastering CSS, though. One is that CSS has an extremely large vocabulary of properties and values that we can use. Another is that browsers are too forgiving of errors, which can be frustrating when pages don't look the way we want them to, and we don't know why.
My advice is to go slowly and try to understand the principles that underlie the ideas we learn. The large vocabulary will begin to feel more comfortable as you use more and more of it in your pages. That means that practicing CSS is even more important than practicing some of the other skills you learn.
CSS really is quite remarkable. We can make the same page look
an infinite number of ways through our styling.
CSS Zen Garden
shows many examples of how different style sheets can change the
appearance of the same content. For something even wilder,
check out
the Mona Lisa
— created in pure CSS. Pointless but fun
indeed!
This week we will focus on using CSS to create the style of a web page. Next week we will turn our attention to using CSS to create the layout of a page.
Download this starter code so that you can follow along and try the same things that I try in class.
CSS Syntax
A CSS file is a sequence of rules. Each rule
consists of a selector and one or more
declarations in curly braces, {...}. Each
declaration is a property: value
pair terminated with a semicolon.
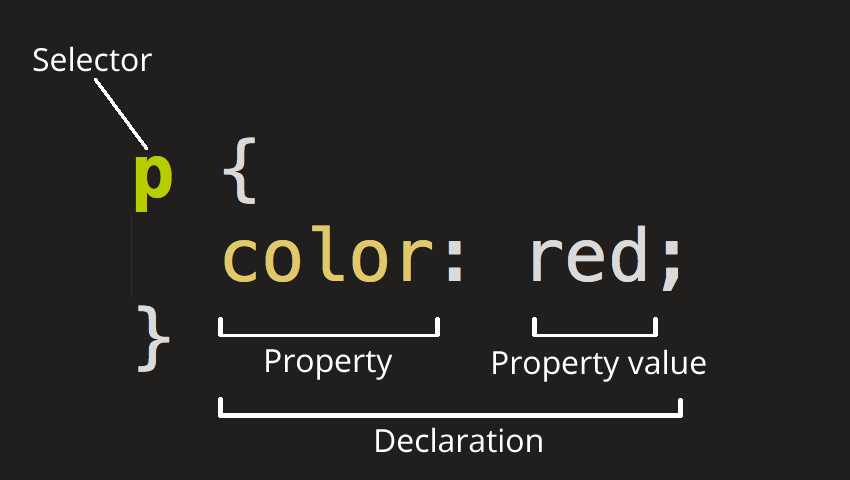
That is almost all there is to the rules for writing CSS. There are many kinds of selector, including a few with their own punctuation, and many, many properties and values that can describe a style. This week's reading introduces some of both. The reading covers only a selection of both. Throughout the next few weeks, we will encounter more kinds of selectors, one of which we will see yet today, and more properties.
Exploring CSS in the Dev Tools
One of the best ways to learn about CSS is to look at how other sites use it. When you find something on the web that you think looks interesting, open your browser's dev tools and inspect the CSS styles.
You can look at the specific properties specified for an element, or see all the computed styles, that is, everything, including all default values. You can also toggle individual properties on and off, or double-click the values to enter your own.
Where to Put CSS
CSS styles can appear in four places. The browser applies them in priority order. Web developers control three of them.
Suppose we want the text in the blockquote to be turquoise. We can define an inline style, an internal style, or an external style.
We can define an inline style by placing a CSS declaration
directly on the blockquote element using the
style attribute:
<blockquote style="color: turquoise;">
  This text appears as turquoise text.
</p>
This applies the style to only to this element.
We can also define an internal style by using the
style element in the file's head:
<style>
blockquote
{
  color: turquoise;
}
</style>
This applies the style to every blockquote on the
page.
Finally, we can an external style by defining the CSS rule in
a .css file and then include the file into the HTML
file using a
link element
in the HTML file's head.
Inline and internal styles can be handy during development, but we should use them with care. Professional standards discourage their use in production. The web browser can cache files, that is, save a copy of the file locally. When it caches a CSS file, it does not have to reload it every time the page changes. This makes loading and reloading pages must faster.
So: Put your CSS in a file with a .css extension
and link it into your HTML file. Use inline or internal styles
only for temporary experiments, or very special cases.
A web page can load multiple stylesheets. The pages for this course usually load two stylesheets: a main file that defines styles common across the entire site, and a file that defines styles for the specific kind of page (session notes, homework assignments, etc.). The browser processes the stylesheets in the order listed.
External files can also come from other servers. This is common when using a shared library of styles, such as Bootstrap.
What about browser defaults? Every browser has its own. Most are similar. Defaults are helpful for styling content we have not written custom CSS for. When I want a simple page, I sometimes rely on the browser to provide default styling.
But there are differences, which can make creating an identical look across platforms difficult. normalize.css is a CSS file that creates a common baseline for the most common HTML elements, so that content looks the same in all browsers. It is available to load into our HTML files via https://cdnjs.com/libraries/normalize (a CDN link). I use a local copy of reset.css, another simple variant, in all the pages on the course website.
Colors in CSS
PLACEHOLDER—TEXT TO FOLLOW
We can use CSS to set the color of the text and the background
of an HTML element, using the color add
background-color attributes.
Color values come in many varieties. The most common are named colors, RGB values, and hexadecimal values. (Hex values are more popular among programmers, where base-2 and base-16 numbers are common.) This week's reading discusses each of these in some detail. If you would like to read more about these three, or learn about the others, check out the MDN <color> page.
You can use MDN's Color picker tool to select a starting color, copy its RGB or hex value, and then tinker with the values to achieve a specific color you have in mind. You can also hover over a color value in VS code and use the color tool that pops up.
An Example with Effects
Containers for Styling
In Session 5 we learned
that div and span are "generic"
containers, but their purpose may not have been clear. Why
bother wrapping other elements in
<div>...</div> or
<span>...</span> tags at all?
With CSS we can now start to take advantage of what they provide. We can add style to a group of elements all at once by wrapping them in a container and then defining styles for the container, or for elements that appear inside the container.
div is a block-level element, and
span is an inline element. Depending on how we
want to group and apply styling, we can use one or both.
Consider the following:
<style>
  .info-box { border: solid green; }
  .info-box p { font-family: Serif; }
  .info-box span { font-weight: bold; }
</style>

<p>This paragraph won't have any special style applied.  Neither will this <span>span</span>.</p>

<div class="info-box">
  <p><span>Name:</span> Eugene Wallingford</p>
  <p><span>Address:</span> East Bartlett 019</p>
</div>
By giving the div a class value of "info-box", we
apply styles to the containing the two paragraphs, as well as
to the paragraph and span elements within.
Styling Links
In addition to styling text, we can control the way that links
(that is, a elements) appear in our document.
By default, a link is underlined in solid blue until visited,
when it is underlined in solid purple. To remove the underline,
or to change a link's color to match the theme of a page, we can
use CSS
pseudo-classes
associated with the a tag.
With pseudo-classes, we can specify certain states for the elements in our selector. Here are the pseudo-classes associated with anchors:
-
a:link— a normal, unvisited link -
a:visited— a link the user has visited -
a:hover— a link when hovered over with the mouse -
a:active— a link while it is being clicked
To change links so that they use blue text with no underline until the mouse moves over them, when they are underlined, we might say:
a:link, a:visited {
  text-decoration: none;
}

a:hover, a:active {
  text-decoration: underline;
}
Closing
Here are the final versions of our HTML file and our CSS file after the session.
The reading for this week is a little longer than in past weeks. CSS offers us a lot of features. It will be impossible for us to remember them all, especially at the beginning. Let the reading serve as an introduction to what is available, in hopes that you may recall an property when you need to use it.
That page also points to two recommended readings. Keep in mind: These are references, not textbooks. You don't need to read them like a text or a novel. Browse the pages, familiarizing yourself with what's available and learning a few things along the way. You will want to refer back to these resources during the semester whenever you want to find a tag or attribute you need, or want to refresh your memory on how something works.
Homework 3 is available and due on Friday. It is our final "HTML-only" assignment of the semester. You don't have to do any styling for the pages you create for this assignment! If you want to do so, you certainly may, but I'll focus my review on the HTML you are practicing there.