Overview
We have seen some "programming" activity (via the code.org course) and discussed what programming is. There are a variety of things you (or your students) can do with Scratch)—story telling, animation, having the computer draw, games, trivia/quizzing, etc. This assignment has to do with drawing, in particular drawing regular polygons. This document has two parts—the specifications for the assignment and information that should help you understand how do to the assignment.
Activity Specifications
This activity asks that you produce a Scratch program that accomplishes three drawing tasks—drawing regular polygons, drawing spirals, and drawing a spirograph-like image. I will demo a program to show what is meant--your programs are not meant to duplicate mine, just accomplish the three tasks. We will also use some class time to develop algorithms for the activities.
The program you plan and implement should meet the following expectations.
- pass the green flag test
- draw a regular polygon with the number of sides requested by the user
- draw an open spiral
- draw a spirograph image
- use/create at least one new block that accepts one or more parameters (likely a block to draw a polygon with a given number of sides)
Remember the "pair programming" process as you work. One person types and the other person watches and corrects, questions, etc. After a bit (at most 30 minutes) you change roles.
Submitting your work
When you are finished with your program you will want to share it with the class by placing it in our studio. That process involves:
- making sure the project is named and saved
- "sharing" it on Scratch and in adding it to our "studio"
I prefer the following approach
- click the See project page button near the top right corner
- enter any instructions you want people to see
- enter "Notes and credits" ... minimally the user ids of the student submitting the work
- click the Share button (near top right of window)
- scroll down (and left) until you see a bar containing four links: a star, a heart, "Studios", and "Embed"
- click on the Studios link/tab
It should show our class studio (PEEE_spring18) as a link and a checkmark (also as a link)
- click on the checkmark link
It should turn green.
- click on the PEEE_spring18 link
You should be able to see that your project has been added to the studio.
That should be all it takes to "submit" the program. Whichever partner submitted the program should have the other partner sign in to Scratch and double check that the project is available in the studio. Don't forget that both partners need to jointly complete the PAC assignment for this activity.
Note that you should always be able to get back to the project page or to the Scratch programming environment from which you can access the project page. If you joined Scratch, your projects should all be available and be saved regularly by the system.
Grading
I will be checking the programs to see if they meet the specifications (noted above). A program that minimally meets all the specs is at least "okay" (will get a C or better). Better programs will go beyond the the minimal specs, e.g., change/set sprite names, use non-standard pen sizes and colors, have neat code areas, comment code if helpful, use input from the user in the program, have multiple new blocks, use more than one parameter to the blocks, avoid glitches (e.g., extra lines, interfering graphics, etc.), etc.
Scratch Programming Information
The information below may be useful as you produce Scratch programs.
General Environment Information
- Areas—stage, backstage, work area (scripts, costumes/backdrops, sounds), backpack
We explored most of these in class. Remember that the work area elements are associated with specific actors (stage and sprites).
The backpack is at the bottom of the workarea and can be used to copy script elements from one project to another. To remove something from the backpack, use Shift-click on an item and select delete.
The location of the cursor is located at the bottom right of the stage. There is also a small triangle there that will toggle between a small stage and a medium-sized stage. At the upper left of the stage is a maximize button that toggles between show the whole environment and the stage only.
- Work area
The work area is the right half of the window. There are three things (in tabs) you can work on—scripts, costumes, and sounds. What they contain depends on the actor (stage or sprite) that is selected. Note that the stage's costumes will be called backdrops.
Some information about the script work area:
- You can drag blocks in and link them to form a script. An actor can have multiple scripts. Each will typically run/be executed under different circumstances.
- Clicking and dragging a particular block will remove it and anything below it from the part of the script above it. The selected part of the script can be dragged and be inserted in another part of the script or another script.
- Right-click or (on a Mac) Shift-click on a block (or piece of a block) will allow you to duplicate or delete the block and anything below it (or piece of the block). The right-click/shift-click will also allow you to add a comment to the block. (Comments are typically place at the beginning of a part of a script that accomplishes a particular task.)
- Right-click/Shift-click on a blank spot in the script work area will allow you "clean up" your code, i.e., make spacing and alignment similar.
- The sprite's location (x- and y-coordinates of the center of the sprite) are shown in the upper right corner of the script work area.
- Sprites
Sprites have a variety of characteristics or properties. The i or info icon on each sprite allows you see the characteristic/property values of the sprites and to change its name if you so desire.
Another characteristic of sprites is that they have a "center". The center is the basis used for positioning when you have them go to a particular location or when you examine their x position or y position. You can set the center of a sprite by examining its costume and clicking on the set center icon (in the upper right corner of the drawing tools). Once you click the icon, you can move the crosshairs to set a new center.
- Script palettes
There are ten palettes in the script work area. There are four types of blocks or block elements in the palettes.
- script start blocks
These blocks are curved on the top and can have other blocks placed under them but nothing on top of or before them. They are the starting points for scripts.
- script action blocks
These blocks are rectangular (have straight ends) and have notches on their tops near the left end and tabs on their bottoms to show that they can connect (like puzzle pieces) to blocks above or below them.
- data values and operators (produce numeric or text values)
These blocks are ovals; have rounded ends. They plug into oval or rectangular "holes" in the action blocks and affect some aspect of the action. Most of the palettes have a few data blocks. The Data palette lets you create new variables/data blocks
- conditionals (produce Boolean values of true or false)
These blocks hexagons, have ends that look a bit like triangles. They plug into decision-making or testing "holes" in the action, control, and operator blocks. These appear mostly in the Sensing and Operator palettes.
- script start blocks
- Backstage
The backstage area shows all the actors (stage and sprites). At the top of this area are icons that allow you to get new sprites from the library, draw your own sprites, upload images for sprites, or take a picture with your computer to be a sprite (or part of a sprite). You change the sprite being considered by clicking on a new one (sometimes the click is not sensed and you have to click again).
Below the stage's icon are tool icons (similar to the for the sprites) that will allow you to explore/select or produce new backdrops for the stage.
- Menus, green flag, stop sign
At the top of the window are several menus and icons to start and stop the program. You should explore them to see what is there and ask any questions that come to mind.
Assignment Specific Information
- Circle
Drawing a circle in Scratch is similar to what was done in the Code.org course—repeat 360 times (move 1, turn 1). Thinking abstractly this produces a 360-sided polygon rather than a circle. It turns out that you when drawing in the Scratch environment a 20- to 30-sided polygon looks essentially the same as a 360-sided polygon and is drawn much faster.
Also, thinking abstractly (and mathematically) note that when drawing a circle the sprite (or a human) will turn 360 degrees.
- Regular polygons
The discussion of circles above suggest that a way to draw any polygon we wish. Algorithmically, it would be:
        repeat  sides  times
            move  some distance
            turn  some amount
Note that sides refers to the number of sides you want the polygon to have. Similarly, some amount (to turn) also depends on the number of sides. Since we wish to have turned around once when we get done, i.e., to come back to our starting location the total amount of turning needs to be 360°. For that to happen we need to turn
360 / sideseach time we turn. Finally, the some distance value depends on how big we want the polygon to be. More sides will imply shorter side lengths if you want keep the drawing contained in the stage. A reasonably sized polygon can use400 / sidesas the amount to move when drawing the sides of the polygon.The information here should be sufficient to draw basic polygons. Other issues exist or can be addressed as you gain more facility with programming, e.g., specifying the position of the polygon, sizing the polygon more automatically (e.g., as if it were inscribed within a circle of a given diameter), the polygon's orientation, etc. (You might think about these after you get done with the assignment. They involve some nice mathematics.)
- New blocks/instructions
One part of the assignment deals with creating new actions or blocks (or instructions). Scratch did not originally have this capability but did eventually include this basic capability in programming. The process for doing so is describe below.
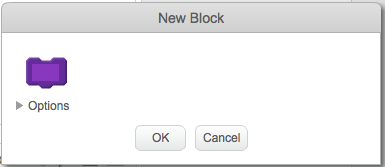 Start a new block
- select the More Blocks palette
- click Make a Block
When you do a popup like the one at the right should appear. The lighter purple area is a text-entry area where you should type in the name for the new block, e.g.,
drawPolygon. If you name the block and click okay, you can come back later and edit it. When you do, a new curved-top definition or start block should appear. It will be purple in color.
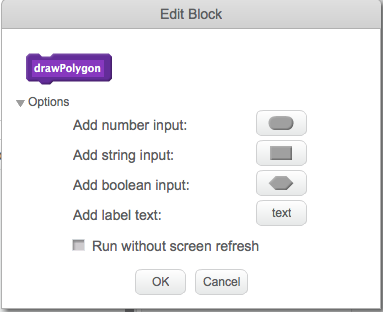 Identifying parameters for the new block
If you clicked okay on the block definition discussed above, you can edit the definition. Right-click/Shift-click on the curved-top definition block that appeared in the script work area and select edit. A popup appears—you need to click on the options icon. When you do several choices appear (see image at the right). In our case we want to select the Add number input: option and enter sides as the name for the input.
 Defining actions for the new block
The above actions created a start block for the new block. It should look similar to the image at the right. Now all you need to do is place beneath it the appropriate control and action blocks for drawing the polygon.
Note that the parameter (
sidesis this case) is a data block that can be selected and placed in any instruction block or operator block in which we decide it is needed.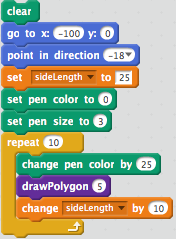 Completing and using the new block/instruction/action
Substantial thought should be exercised when you create new blocks or actions. The new block should do everything it needs to do but only what it needs to do in all cases. for example, a
drawPolygon(sides)block should draw the polygon but typically should not: get to the starting point or set the pen color or size. On the other hand it probably should: put thepen down, do the drawing, and pick thepen up. It might or might not, point in the appropriate direction, set the rotation style, or other actions.All those things may need doing. The question is whether they should be done inside the new block before the block is used. For example, we might want to do something like the code at the right. Note that it makes use of the new
drawPolygon(sides)block that we created. (When you define a new block the definition stays in the script work area and block to have those actions carried out is place in the More Blocks palette. The block in the More Blocks palette is used like any other action block in any of the palettes.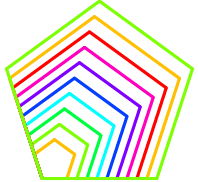 In case you are interested, the code above in conjunction with the code inside the
 drawPolygon(sides)block produces the image at the right. Note that much of the code exists outside thedrawPolygon(sides)block.
- Spiral
A spiral is produced almost like a polygon, except that after drawing one side and turning, the next side drawn is a bit longer. When drawing a polygon, the actions inside the loop were always the same. Now, however, the actions are the same but the distance moved changes each time. An additional change is that we don't just create the number of sides associated with the amount we turn. Rather we probably want to keep drawing sides until the length gets close to taking us off the screen. An English-like algorithm that accomplishes these things assuming we want a pentagon-like spiral is given below. (You saw something like this in the Code.org activity.
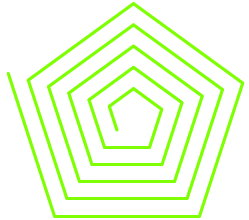 An English-like algorithm that accomplishes these things (assuming we want a pentagon-like spiral) is given below. I went from that to a more code-like (often called pseudocode) algorithm shown further below. Then I created a block to draw the spiral and code that called the new
 drawSpiralblock. The result of that code is shown at the right.set the variable sideLength to a reasonable starting value repeat until the sideLength is too big move sideLength steps turn 72 degrees add 10 to sideLength
The pseudo-code algorithm for the
drawSpiralblock.set sideLength to 25 repeat until sideLength > 150 move sideLength turn 72 change sideLength by 5
 The Scratch code I used to call the spiral block is shown at the right. Note that the this time the spiral was all in the same color. Since the spiral is drawn in its entirety by the
 drawSpiralblock I would have to change the code in that block to introduce differently colored sides. In that case, however, I might want to create a different block calleddrawRainbowSpiral. 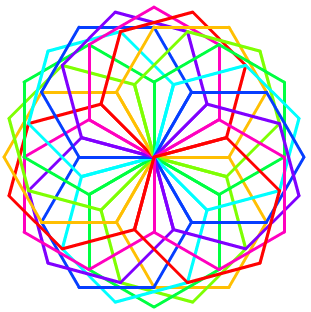 Spirograph
A spirograph is a commercial tool/game that one can use to draw interesting images. They often appear to spiral but usually consist of polygons that are repeatedly drawn in slightly offset ways. The image at the right is an example of one. For our purposes, a spirograph image is drawn by drawing a polygon then turning a bit and drawing another polygon similar to the first (probably varying only in color).
It seems reasonable to use the
drawPolygoninstruction block when devising the solution to this task. We just need to figure out the combination of how much we want to turn each time and how many times we'd need to repeat the drawing of the polygon. Presumably we'd want to stop when any additional turns would start retracing our steps (when we had turned a multiple of 360 if my mathematical thinking is correct). We would also have to figure in where the color changes would be and starting values for color, pen size, etc. There might be some guess and check coding for doing that.Hopefully, with the information given above for polygons and spirals, you and your partner(s) can accomplish this task without further examples. If, however, you get those done and have difficulty here, please do ask for assistance.
- Passing the Green Flag Test
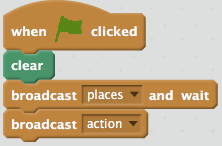
The green flag test involves being able to click on the green flag and have the program run correctly. After a Scratch program runs, the sprites and variables maintain the state they ended with. If a sprite changed position, size, color, heading, etc. during the program those characteristics will be in play when the green flag is clicked the next time. So, it is important to make sure program initialization occurs at the beginning of the program.
We recommend having the stage control this initialization process. It would do so by using the script shown to the right. This script will clear the screen, send a message ("places") that sprites can listen for and respond to. The and wait on the broadcast means all sprites will report back when they have completed their initialization (this occurs behind the scene and you need not worry about it, just know it works). The
broadcast [action]block does not need to wait.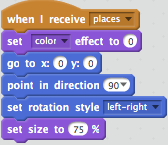
Each sprite that needs to do some initialization should be listening for the places message to be broadcast, i.e., have a script that respond to the message being received. See the example at the right. Note that these and/or other actions might be necessary to get the sprite back into the condition needed at the start of the program.
Most sprites will need to respond to the places message. Typically, however, only one or a few of the sprites would need to respond to the action message.
Also, note that messaging via the
broadcast [...]andwhen I receive [...]blocks can be used to have sprites interact in various ways. - Other stuff
As you work on these tasks please try out other ideas that occur to you. If there is something you are interested in but don't feel able to complete, ask. And, have fun!